Novell Single Sign On
You may still need to manually create user accounts if you need access to FaxPress through a third party application or gateway product such as MS Word or Microsoft Exchange.
Using Single Sign On to register your user accounts automates the creation, registration, and maintenance to your FaxPress user accounts.
In brief, the implementation steps are:
| 1. | Configure your FaxPress Premier server to enable Single Sign On. Refer to User Authentication (Novell Only). |
| 2. | Assign users to the FaxPress Premier specific groups using your Novell administrator utilities. |
| 3. | Optionally, create one or more FaxPress Premier user account template(s). |
| 4. | Let users login. Their FaxPress Premier accounts and mailboxes will be automatically created the first time they login. |
Some individual user properties not defined in the template must be manually configured.
The maintenance of you FaxPress Premier users will now be performed through your Novell network mechanism. You can periodically remove obsolete user accounts at the click of a button through the Storage Reclamation tab of the Server Properties.
Use your Novell administrative tools to assign users to the FaxPress Premier groups. Refer to User Authentication (Novell Only) for details on locating the FaxPress Premier serial number and global groups.
If a particular user is a member of two or more groups, the privilege level assigned to the serial number group takes precedence.
Create a User Properties Template
The first time a user of a group receives a fax, a default mailbox will be created using properties specified in the Mailbox template based on box in the User Authentication tab in your Server Properties dialog box. These properties include parameters such as print confirmation page and printer configuration. You can use any of the standard FaxPress templates: Guest, User, Router, Operator, and Administrator, or create a new user and configure it to your own specifications.
To create your own template, follow the instruction for creating a new user, and then configure it accordingly. Then add the new template in the Mailbox template based on box in the User Authentication screen.
The standard settings of automatically created user accounts can be customized at any time. See Creating User Accountsfor more information.
When a FaxPress Premier server is configured to utilize Single Sign On the process of logging in changes dramatically.
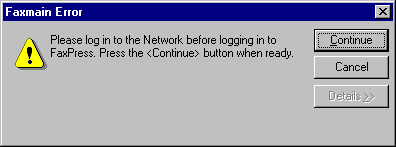
| 1. | Based on the specified method of authentication, FaxPress Plus will verify that the user is logged into the network. If user is not logged in, FaxPress Plus will prompt the user to login to the network. |

| 2. | Once the user is logged into the network, user information will be retrieved. |
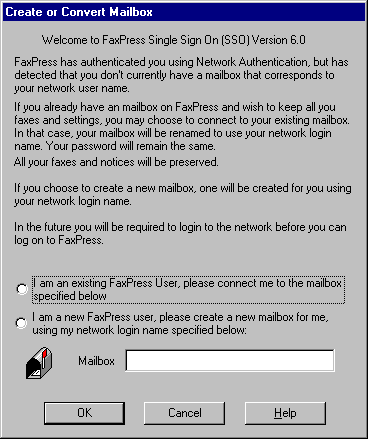
| 3. | If the user has never used FaxPress Plus on this system before Single Sign On was enabled, the Create or Convert Mailbox dialog box will appear. |

In the Create or Convert Mailbox dialog box:
| a. | If you select I am an existing FaxPress User, please connect to and specify the name of your mailbox in the Mailbox field, your network login will be associated with the designated FaxPress mailbox. |
| b. | If you select I am a new FaxPress User, please create and specify the name of the mailbox in the Mailbox field, the FaxPress mailbox will be created and your network login will be associated with the designated FaxPress mailbox. |
| ■ | If you click Cancel, you will be prompted for conventional (non Single Sign On) login information. |
| c. | Click OK to login to the FaxPress. If your Novell user name and your FaxPress mailbox user name are not identical, you will be prompted to convert your FaxPress mailbox name to your Novell user name. |

Be careful! The FaxPress user account that you rename will no longer exist under that name and cannot again be accessed.
| 4. | If this is not the first login since Single Sign On was enabled, then the user is logged into FaxPress using the network user name without being prompted for a user name or password. |
Remove Network Association option
You can break the association between a FaxPress mailbox and a Novell network user by removing the link from the FaxPress mail box to the fully qualified network name or FNN. This may be necessary prior to removing obsolete mailboxes. For example, if a user’s network account has been removed and you remove obsolete mailboxes using the Storage Reclamation function in the Server Properties, the FaxPress user account will be deleted. If you need to access this account later, you can just eliminate the link to the network account. Now the FaxPress mailbox is a stand alone account requiring manual login with user name and password.
|
FaxPress Premier WebHelp
Last Updated: 11/1/2007
E-mail this page |
Castelle 855 Jarvis Drive, Suite 100 Morgan Hill, CA 95037 Toll-free 800.289.7555 Tel 408.852.8000 Fax 408.852.8100 |